I came across some problems trying to create a slot to separate the left and right mouse buttons. "0 Thickness geometry". Which was a lie. After a few different approaches, I decided that it wasn't necessary. There would be enough flex in the material to operate both left and right without the slot.
Hello and Welcome!
Hello and Welcome!
My name is John Nicholl. I'm an Industrial Design student, based in Adelaide, South Australia and this is the beginning of somewhere that I can think aloud and share my work.
More current projects are posted on my website.
Twitter, Instagram and Tumblr: jwrnicholl
Sunday, June 29, 2014
Computer Modelling Journal, Week 15: Part 2
The model is done! Finished. No more Solidworks for a little while.
I came across some problems trying to create a slot to separate the left and right mouse buttons. "0 Thickness geometry". Which was a lie. After a few different approaches, I decided that it wasn't necessary. There would be enough flex in the material to operate both left and right without the slot.
Finally, Heres my result.
I came across some problems trying to create a slot to separate the left and right mouse buttons. "0 Thickness geometry". Which was a lie. After a few different approaches, I decided that it wasn't necessary. There would be enough flex in the material to operate both left and right without the slot.
Labels:
CAD,
Mouse,
product innovation,
Solidworks,
student,
unique
Friday, June 27, 2014
Computer Modelling Journal, Week 15: Part 1
Having had a complete model of the design I wanted, but then solidworks not want to comply with my shell command, I've shifted to a mouse designed to look like a snake's head.
Prior to this design, there were a few attempts at remodeling it. I came across issues when trying to resolve the design at the bottom of the mouse.
In the end I've just used the mouse underlays as a guide for the size of the snake head mouse.
Over the weekend and Friday, I'll be filling in the simple extrusions and shapes to make the parts interface with each other in a more logical way.
Saturday, June 21, 2014
Computer Modelling Journal, Week 14
The last few weeks have been busy and so this post is slightly late A new assignment is at hand. Designing and modelling a mouse of my own based on the technical package of the Logitech M185. The plan is to use a modified set of parts for the innards, to more accurately represent the real thing. I know for a fact that the PCB will need to be adjusted to better suit the angle at which the battery sits.
I started with some sketches, then moved on to a foam model for confirmation of form. To avoid complicating the project and in the interest of keeping to a workload which suits the available time, I've opted for a symmetrical design. Suggestions had been made to use the styling of existing products as inspiration for the design, but I've just gone for what I think to be visually appealing in my own eyes.
With the foam model it is easy to take photos as elevations of the mouse to use as a guide in Solidworks. Keeping in mind that the foam is not perfect to work with, the form isn't final, and i may still make some changes.
I started with some sketches, then moved on to a foam model for confirmation of form. To avoid complicating the project and in the interest of keeping to a workload which suits the available time, I've opted for a symmetrical design. Suggestions had been made to use the styling of existing products as inspiration for the design, but I've just gone for what I think to be visually appealing in my own eyes.
With the foam model it is easy to take photos as elevations of the mouse to use as a guide in Solidworks. Keeping in mind that the foam is not perfect to work with, the form isn't final, and i may still make some changes.
Labels:
CAD,
Custom,
industrial design,
Logitech,
M185,
Mouse,
Solidworks,
unique
Friday, May 30, 2014
Computer Modelling Journal, Week 11
Final Week!
This weeks has bee super busy. I'm mentally exhausted. The finishing touches to the model this week involved a lot of tiny little bosses and cuts to create the important clips for the inside of the mouse. (which by the way is terrible and has excruciatingly low tracking resolution)
Some fine wires to make contact with the battery have been added to the PCB assembly. Their construction is quite simple. A few sketches to use as construction for a sweep feature. Some techniques that I've not used in Solidworks before were the helix and coil tools. Very interesting.
Holes and details to the gray middle area have been added. Some of the features have been simplified, simply because of time constraints. I have no doubt I could recreate them in any other case.
Some issues revealed themselves when dealing with the bottom section of the mouse. One was a self intersection error when trying to thicken the surfaces I'd modeled. Another was zero thickness geometry when i tried a different approach to creating the part. Ultimately I gave up on it, but the part looks accurate enough in my opinion. The following image is the oversize thickness that was created with another approach. I trashed that.
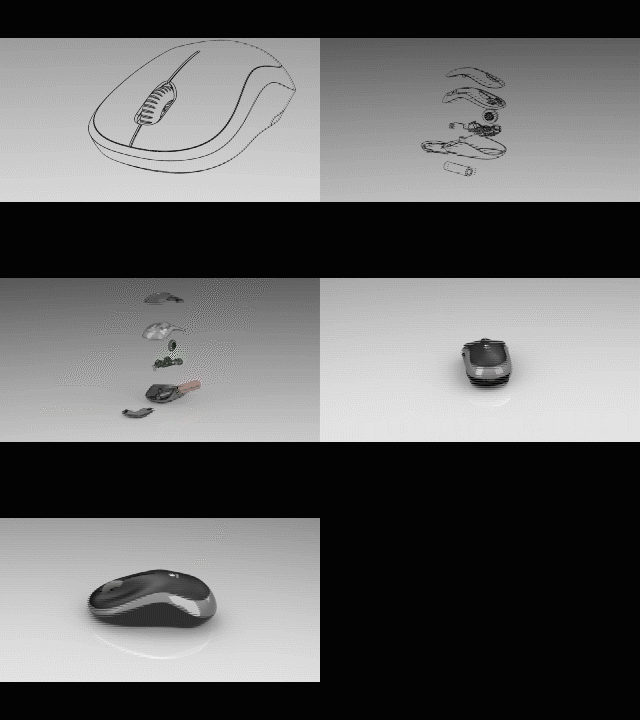
Moving on to creating renders and animations... I had a frustrating time, leaving my motion study render running for a whole 2 days, then realising it. glitches out and all my camera angles were snapping isntead of transitioning smoothly. Don't know why, but it worked the second time around when i toned down the render quality. I used some editing software to transition from a line drawing to a fully rendered animation just for the hell of it. Still photo renders were not a hassle, although the Photoview feature which rounds off sharp edges couldn't figure out how to make it work for the organic curves of the mouse. Point is I know its there and the software is just not quite smart enough. Here's a gif of my animation and some comparisons between rounded edges on a part.
This weeks has bee super busy. I'm mentally exhausted. The finishing touches to the model this week involved a lot of tiny little bosses and cuts to create the important clips for the inside of the mouse. (which by the way is terrible and has excruciatingly low tracking resolution)
Some fine wires to make contact with the battery have been added to the PCB assembly. Their construction is quite simple. A few sketches to use as construction for a sweep feature. Some techniques that I've not used in Solidworks before were the helix and coil tools. Very interesting.
Some issues revealed themselves when dealing with the bottom section of the mouse. One was a self intersection error when trying to thicken the surfaces I'd modeled. Another was zero thickness geometry when i tried a different approach to creating the part. Ultimately I gave up on it, but the part looks accurate enough in my opinion. The following image is the oversize thickness that was created with another approach. I trashed that.
Moving on to creating renders and animations... I had a frustrating time, leaving my motion study render running for a whole 2 days, then realising it. glitches out and all my camera angles were snapping isntead of transitioning smoothly. Don't know why, but it worked the second time around when i toned down the render quality. I used some editing software to transition from a line drawing to a fully rendered animation just for the hell of it. Still photo renders were not a hassle, although the Photoview feature which rounds off sharp edges couldn't figure out how to make it work for the organic curves of the mouse. Point is I know its there and the software is just not quite smart enough. Here's a gif of my animation and some comparisons between rounded edges on a part.
All in all I'm happy with the result. I didn't feel as though much needed to be adjusted to the scene for the renders. I believe there is a reason the defaults are set the way they are, thought i did play around for a while before coming to this conclusion.
Finished Renders!
Saturday, May 24, 2014
Computer Modelling Journal, Week 10
This week has been slow, but so far the PCB and components are finished to a level that I'm satisfied with.
Some progress on the Mouse's outer parts has been made also. Mostly with regards to the gray strip that runs around the edge of the mouse and houses the top part. So far it has thickness and some progress towards adding the small lip that exists around its edge has been made. This week hasn't been one for progress. Hopefully the next will be.
Sunday, May 18, 2014
Computer Modelling Journal, Week 8
This week I've started to focus on the overall body of the mouse. Using some tools that I've not used before. These are the surface tools in Solidworks, which allow for the creation of faces with no mass.
The approach so far has been to create completely curved surfaces from traced splines. The first step was laying out photographs of the mouse which were taken from a fair distance to reduce any perspective distortion. I used a camera with a 50x zoom lens which I borrowed. It worked a treat I Think. Once they were imported into Solidworks I began tracing important features
First up was the gray area through the centre, just because it looks fun. I started with a couple of splines that follow the side profile of the gray band, then followed with outlines from the top view and also the bottom. The bottom outline is just the overall outline of the mouse.
Using the outlines and the profile lines, I projected curves in 3D space that could then be used as surface loft guides. There are also some splines which arm from the top and bottom of the gray band which serve as the loft's profile.
The bottom chamfer of the mouse was next up. This way I could use the top and bottom curves of the chamfer and gray bands respectively to create the middle section. The same process is repeated through the rest of the model as it stands for now.
This is the middle section...
To evaluate my model, I've used the Curvature and Zebra Stripes tools. The Curvature tool shows the rate at which curves change. If the colours indicate a smooth transition between curves, the part will look sleek, if not it will look like a boring bunch of polygons. The Zebra Stripes tool shows how the light would reflect around the object. Very fun to play with.
Finally, just because renders are fun, this is what it looks like so far...
Computer Modelling Journal, Week 9
This week I filled in the top and trimmed out the battery cover. The top piece is a filled surface with three guides that all have equal curvature to the band that runs around the mouse. The construction for these lines was a little bit of a pain, because Solidworks doesn't like cooperating with me. The guides had to be contained to projected curves that run along the sides of the mouse.
You'll notice the finger indents are already there. Those were made with the Freeform tool. Symmetry is important for this one. I trued to minimise the amount of movement to achieve the right shape. Too much movement distorts other pants of the surface.
The approach for making two separate surfaces bodies for the battery cover and bottom parts the base has to be duplicated, then trimmed so that there are two surface bodies which are identical to what existed previously. A series of projected curves and sketches were used to create a compound curve that i could use to trim the surface bodies.
I've had a play with the middle piece's recess for when I start adding thickness to the parts. Using a simple offset surface from the top piece works well, but it doesn't accurately represent the front of the recess where it is slightly larger and has a steeper angle that the rear. I'm going to have a thing about this one.
The approach for making two separate surfaces bodies for the battery cover and bottom parts the base has to be duplicated, then trimmed so that there are two surface bodies which are identical to what existed previously. A series of projected curves and sketches were used to create a compound curve that i could use to trim the surface bodies.
I've had a play with the middle piece's recess for when I start adding thickness to the parts. Using a simple offset surface from the top piece works well, but it doesn't accurately represent the front of the recess where it is slightly larger and has a steeper angle that the rear. I'm going to have a thing about this one.
Subscribe to:
Posts (Atom)